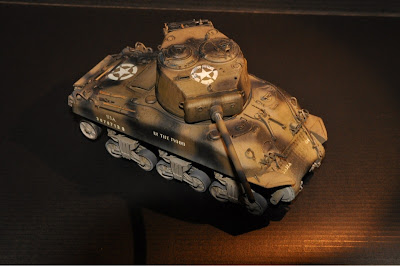
The M4A1 is one of my favorite sherman designs, I love the smooth lines of the casted hull.
This version of the M4A1 i currently am working on is the 76mm (wet) version that belonged to S/Sgt. Lafayette G. "Lafe" Pool and his crew.
Pool was the U.S. army best tanker during WWII who, together with his crew, destroyed 258 enemy vehicles, killed over 1000 soldiers and took over 250 prisoners. All this in only 83 days using 3 shermans all called "in the mood".
The last sherman, a M4A1 76mm W, was taken down in Germany near Stolberg on september the 19th 1944. (more about S/Sgt pool on can be found on the 3rd armored division website
3ad.com)
The kit i used is from Dragon (#6083) and is build out of the box, that is, no aftermarket stuf is used. I did made some modifications to the kit which i got from the excelent book: Modelling the US army M4 76mm by Steven J. Zaloga.
Turret
The kit T23 turret has incorrect foundry symbols, the M4A1 used a turret casted at Union Steel Castings instead of the M4A3 turret supplied by the kit, this one was cast by Continental-Hubbard. I removed the wrong casting symbols and added the "correct" ones using numbers cut from sprues.
I also removed the armored rear turret vent cover (the first 400 turrets were without one) and filled the area between the two hatches.
The two piece split-hatch in the kit is the D69993 hatch while the 76mm turrets used the D94598 low profile hatch. Although i didn't had the correct hatch i did made some changes to the hatch to look like a low profile hatch.
Fenders
The fenders supplied by the kit are the single piece type while the M4A1 used the two part fenders. This was fixed by removing some detail, add a cut in the fender to mimic two separate parts and add a reinforcement rib where the fender meets the hull.
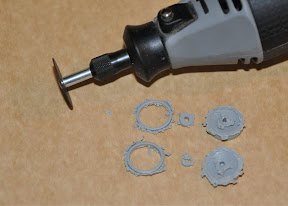
Idler wheels
Somehow Dragon decided that the backside of the idler wheels did not needed any detail resulting in hollow ones.
The kit has some spare wheels that i used as the backside of the idle wheels. Using my dremel tool i cut the wheels in half and glued them together. After some sanding and putty the result was idler wheels with details on both
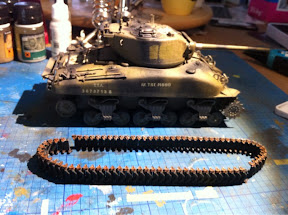
Tracks
I used the kit supplied tracks with invidual track links, last time i did this it resulted in a complete nightmare and buying aftermarket tracks.
This time i copied Steven Zaloga's track wigs as described in his book. Using these wigs i was able to create straight tracks without the end connectors pointing in every direction.
Painting
The model was painted in 4 steps using 3 different colors Vallejo surface primers. The fist coat was done using US olive drab, second coat using German dark yellow and the last coat using IDF sand grey.
I had read a model kit review where the builder used these primer colors to paint and wanted to try this technique instead of the usual preshade technique.
After the model had a nice lightened shade of olivie drab i added the black camo pattern.This was done in two steps: the first step was done using a grey/ black mix and the second step was darkening the camo pattern using pure black.
After painting the camo scheme i used plain od to mimic patches of paint on the turret the crew put on to remove the tactical signs.
After painting the camo pattern the sherman was coated with a gloss finish.
Decals
The stars and registration numbers where done using mask and airbrushing stencil-white from Vallejo panzer-aces. A good lesson was to pay attention to the mask position on the model because i ended up with a turret star not being in the center and a registration number that is not alligned nicely.
The only decals i used from the kit are the "im the mood" slogan on both sides of the hull and the bumper numbers. These decals where applied using a setter and fixer from Vallejo and after drying covered with a coat of gloss vernish.
Weathering
This will usualy be the moment where i screw up the model and i am still working on this. I did some minimal chipping and some washes and are now at the point where i need to put on mud and dust.
After screwing up a couple of models at this stage i find my self postponing this last step.